To start developing the Android apps you need to install android studio.
Google provides Android Studio for the Windows, Mac OS X, and Linux platforms. You can download this software from the Android Studio homepage. (You'll also find the traditional SDKs, with Android Studio's command-line tools, available from the Downloads page.) Before downloading Android Studio, make sure your platform meets one of the following requirements:
Windows OS
- Microsoft Windows 7/8/10 (32-bit or 64-bit)
- 2 GB RAM minimum, 8 GB RAM recommended
- 2 GB of available disk space minimum, 4 GB Recommended (500 MB for IDE + 1.5 GB for Android SDK and emulator system image)
- 1280 x 800 minimum screen resolution
- JDK 8
- For accelerated emulator: 64-bit operating system and Intel processor with support for Intel VT-x, Intel EM64T (Intel 64), and Execute Disable (XD) Bit functionality
Mac OS
- Mac OS X 10.8.5 or higher, up to 10.11.4 (El Capitan)
- 2 GB RAM minimum, 8 GB RAM recommended
- 2 GB of available disk space minimum, 4 GB Recommended (500 MB for IDE + 1.5 GB for Android SDK and emulator system image)
- 1280 x 800 minimum screen resolution
- JDK 6
Linux OS
- GNOME or KDE desktop: Tested on Ubuntu 12.04, Precise Pangolin (64-bit distribution capable of running 32-bit applications)
- 64-bit distribution capable of running 32-bit applications
- GNU C Library (glibc) 2.11 or later
- 2 GB RAM minimum, 8 GB RAM recommended
- 2 GB of available disk space minimum, 4 GB Recommended (500 MB for IDE + 1.5 GB for Android SDK and emulator system image)
- 1280 x 800 minimum screen resolution
- JDK 8
- For accelerated emulator: Intel processor with support for Intel VT-x, Intel EM64T (Intel 64), and Execute Disable (XD) Bit functionality, or AMD processor with support for AMD Virtualization (AMD-V)
Once you've ensured your operating system is compatible with Android Studio 2.1.1, download the appropriate Android Studio distribution file. The Android Studio download page auto-detected that, select
android-studio-bundle-143.2821654-windows.exe to download Android Studio setup version can be different.Installing Android Studio on 64-bit Windows 8.1
After the download is complete run

android-studio-bundle-143.2821654-windows.exe file to start the installation process. The installer responded by presenting the Android Studio Setup dialog box shown in Figure 1.
Figure 1. Set up Android Studio
Clicking Next took me to the following dialog box, which gives you the option to install the Android Studio, SDK (included with the installer) and an Android Virtual Device (AVD).

Figure 2. Do you want to install the Android SDK and AVD?
I chose to keep the default settings. After clicking Next, you'll be taken to the license agreement dialog box. Accept the license to continue the installation.


Figure 3. Accept the license agreement to continue the installation
The next dialog box invites you to change the installation locations for Android Studio and the Android SDK.


Figure 4. Set the Android Studio and Android SDK installation locations
Change the location or accept the default locations and click Next.
The installer defaults to creating a shortcut for launching this program, or you can choose to decline. I recommend that you create the shortcut, then click the Install button to begin the installation.


Figure 5. Create a new shortcut for Android Studio
The resulting dialog box shows the progress of installing Android Studio and the Android SDK. Clicking the Show Details button will let you view detailed information about the installation progress.


The dialog box will inform you when the installation has finished. When you click Next, you should see the following:


Figure 6. Leave the Start Android Studio checkbox checked to run this software
To complete your installation, leave the Start Android Studio box checked and click Finish.
Running Android Studio
Android Studio presents a splash screen when it starts running:

On your first run, you'll be asked to respond to several configuration-oriented dialog boxes. The first dialog box focuses on importing settings from any previously installed version of Android Studio.
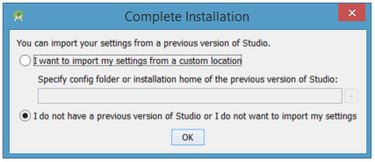
If you're like me, and don't have a previously installed version, you can just keep the default setting and click OK. Android Studio will respond with a slightly enhanced version of the splash screen, followed by the Android Studio Setup Wizard dialog box:


Figure 9. Validate your Android SDK and development environment setup
When you click Next, the setup wizard invites you to select an installation type for your SDK components. For now, I recommend you keep the default standard setting.

Figure 10. Choose an installation type
Click Next and verify your settings, then click Finish to continue.

Figure 11. Review settings

Figure 12. The wizard downloads and unzips Android Studio components
If your computer isn't Intel-based, you might get an unpleasant surprise after the components have completely downloaded and unzipped:
 Figure 13. Intel-based hardware acceleration is unavailable
Your options are to either put up with the slow emulator or use an Android device to speed up development. I'll discuss the latter option later in the tutorial.
Finally, click Finish to complete the wizard. You should see the Welcome to Android Studio dialog box:


Figure 14. Welcome to Android Studio
You'll use this dialog to start up a new Android Studio project, work with an existing project, and more. You can access it anytime by double-clicking the Android Studio shortcut on your desktop.
Comments
Post a Comment